
Oregon Scientific Projection Clocks offer innovative timekeeping solutions, combining atomic synchronization with a clear projection display. They provide accurate time, customizable settings, and user-friendly functionality, making them popular for home and travel use.
1.1 Overview of Oregon Scientific Projection Clocks
Oregon Scientific Projection Clocks are renowned for their advanced features and user-friendly design. These clocks combine atomic time synchronization with a high-quality projection display, ensuring accurate timekeeping and clear visibility in the dark. Models like the Oregon Scientific TW223 and RM328PA offer additional functionalities such as indoor temperature monitoring and customizable settings. The adjustable projection arm allows users to flip the display image by 180 degrees, providing flexibility in placement. Many models also include dual alarms, snooze options, and adjustable brightness settings, catering to diverse user preferences. Their compact design and robust features make them ideal for both home and travel use, while the easy-to-follow manuals ensure seamless setup and operation.

Key Features of Oregon Scientific Projection Clocks
Oregon Scientific Projection Clocks feature atomic synchronization, dual alarms, customizable brightness, and a 180-degree adjustable projection arm. They combine functionality with sleek designs for optimal performance.
2.1 Projection Display Technology
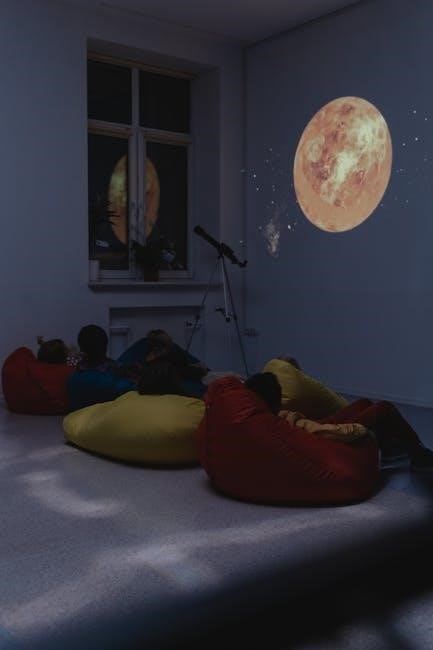
Oregon Scientific Projection Clocks utilize advanced projection display technology to project crisp, clear time and date onto walls or ceilings. This feature ensures easy visibility from any angle, eliminating the need to turn the clock. The technology incorporates a high-intensity LED light for a sharp, readable image, even in low-light conditions. Users can adjust the projection angle up to 180 degrees for optimal placement. The display also supports multiple projection modes, including time, date, and indoor temperature, enhancing its functionality. This innovative feature makes it ideal for bedside use, providing essential information at a glance without disturbing others. The projection display technology is both energy-efficient and durable, ensuring long-term performance.
2.2 Atomic Time Synchronization
Oregon Scientific Projection Clocks feature atomic time synchronization, ensuring accurate timekeeping by receiving signals from atomic clocks. This technology automatically adjusts the clock to match the precise time broadcast by organizations like the National Institute of Standards and Technology (NIST) in the U.S. The clock updates itself for daylight saving time changes and maintains accuracy within seconds. The atomic signal is received wirelessly, eliminating manual adjustments. This feature is particularly useful for users who value precision and convenience. The clock’s atomic synchronization ensures reliability and eliminates the hassle of setting the time manually, making it a standout feature for everyday use.
2.3 Dual Alarm Functionality
Oregon Scientific Projection Clocks offer dual alarm functionality, allowing users to set two separate alarms for different times or purposes. This feature is ideal for households with multiple users or for individuals who need reminders at different intervals. Each alarm can be programmed independently, with options to set specific days of the week or every day. The alarms can be tailored to your preferences, with choices like a gentle wake-up tone or a radio alarm. The dual alarm system ensures that you never miss an important appointment or wake-up time, providing flexibility and convenience in managing your daily schedule effectively.
2.4 Customizable Brightness Settings
Oregon Scientific Projection Clocks feature customizable brightness settings, allowing users to adjust the display’s intensity to suit their preferences. This feature ensures optimal visibility in various lighting conditions, whether the room is brightly lit or dimly illuminated. The adjustable brightness helps prevent the clock from being too harsh on the eyes at night, promoting a restful environment. Users can typically choose from multiple brightness levels, ranging from low to high, ensuring the display is always comfortable to view. This adaptability makes the clock versatile for different settings, enhancing both functionality and user satisfaction without compromising on clarity or readability.

Setting Up Your Oregon Scientific Projection Clock
Setting up your Oregon Scientific Projection Clock involves unpacking, inserting batteries, and placing it on a stable surface. Follow the manual for time zone and alarm configuration.
3.1 Unpacking and Initial Setup
Begin by carefully unpacking your Oregon Scientific Projection Clock from its box. Ensure all components, including the clock, power adapter, and manual, are included. Place the clock on a flat, stable surface, ideally near a power outlet if using the AC adapter. Insert the required batteries, matching the polarity indicated on the battery compartment. Gently close the compartment and turn on the clock. Allow it to initialize, which may take a few moments. Position the clock in a location where the projection can be clearly viewed, and adjust as needed for optimal performance. Refer to the manual for specific placement guidelines.
3.2 Configuring Time Zones
To configure the time zone on your Oregon Scientific Projection Clock, press and hold the SET button until the menu appears. Use the +/– buttons to navigate to the time zone option. Select your desired time zone from the list, ensuring it matches your geographic location. Once selected, press the SET button to save the changes. The clock will automatically update the time based on your selection. For areas with daylight saving time, the clock may adjust automatically if enabled. Refer to the manual for a list of available time zones and additional details on manual adjustments if needed. Proper time zone configuration ensures accurate timekeeping and alarm functionality.
3.3 Setting the Alarm
To set the alarm on your Oregon Scientific Projection Clock, press the ALARM button to cycle through the alarm options (Alarm 1 or Alarm 2). Use the + and – buttons to adjust the alarm time. Press the SET button to save the selected time. You can enable or disable the alarm by pressing the ALARM button again until the alarm icon appears or disappears. The clock also features a snooze function, which can be activated by pressing the SNOOZE button. For dual alarms, repeat the process for the second alarm. Ensure the alarm volume is set to your preference for uninterrupted wake-ups.

Customizing Your Projection Clock
Customize your Oregon Scientific Projection Clock by adjusting the projection angle, display settings, and temperature preferences to enhance your bedroom ambiance and functionality.
4.1 Adjusting Projection Angle
Adjusting the projection angle on your Oregon Scientific Projection Clock ensures the image is displayed clearly on your ceiling or wall. Locate the hinge or swivel mechanism on the back of the clock. Gently tilt the clock upward or downward to achieve the desired angle. After adjusting, check the projection to ensure it’s centered and free from distortion. Proper alignment enhances visibility and minimizes glare. This feature allows you to customize the clock’s projection based on your room’s layout and your personal preference, ensuring an optimal viewing experience.
4.2 Changing Display Settings
To customize your Oregon Scientific Projection Clock’s display, navigate to the settings menu using the buttons on the back or top of the clock. Adjust the brightness by pressing the + or ⎻ buttons until the projection is comfortable for your room’s lighting. You can also toggle between 12-hour and 24-hour time formats. Some models allow you to switch between displaying the time, date, or indoor temperature. Save your preferences to ensure the settings remain consistent. Experiment with these options to find the perfect balance for readability and convenience, enhancing your overall user experience with the clock.
4.3 Setting Indoor Temperature
To set the indoor temperature on your Oregon Scientific Projection Clock, ensure the built-in thermometer is enabled. Press and hold the TEMP button until the temperature display appears. The clock will automatically measure the room temperature and update it every few minutes. For accuracy, place the clock away from direct sunlight or heat sources. You can toggle the temperature display on or off using the same button. Some models allow switching between Celsius and Fahrenheit by pressing and holding the TEMP button for 3 seconds. This feature adds convenience, making the clock a versatile tool for monitoring your environment.
Maintenance and Care
Regular maintenance ensures optimal performance of your Oregon Scientific Projection Clock. Clean gently with a soft cloth, avoiding direct sunlight or moisture. Avoid harsh chemicals to preserve functionality and appearance.
5.1 Battery Replacement and Care
To maintain your Oregon Scientific Projection Clock, replace batteries when low. Use the recommended type (usually AAA or AA) for optimal performance. Open the battery compartment, located on the back, by sliding or unscrewing it. Insert new batteries, ensuring correct polarity. Avoid mixing old and new batteries. Replace all batteries at once for consistent power. Store spare batteries in a cool, dry place. Remove batteries if the clock will be unused for an extended period to prevent leakage. Clean terminals with a soft cloth before installing new batteries. Proper care ensures reliable operation and extends the clock’s lifespan.
5.2 Cleaning the Clock and Projection Lens
Regular cleaning ensures optimal performance and clarity of your Oregon Scientific Projection Clock. Gently wipe the clock’s exterior with a soft, dry cloth to remove dust. For the projection lens, use a microfiber cloth to prevent scratches. Avoid harsh chemicals or liquids, as they may damage the finish. If smudges persist, dampen a cloth with distilled water, but ensure it’s not soaking wet to prevent moisture entry. Never touch the lens, as oils from skin can cause smudging. Clean the display screen with a dry, anti-static cloth. Regular maintenance preserves the clock’s appearance and ensures a clear, sharp projection. Always handle the clock with care to maintain its functionality and longevity.

Troubleshooting Common Issues
Troubleshooting common issues with your Oregon Scientific Projection Clock involves identifying problems like projection clarity, time synchronization, or alarm malfunctions. Always check power sources, clean the lens, and adjust angles for optimal performance. If issues persist, consult the manual for detailed solutions or reset the clock to factory settings. Regular maintenance and proper handling can prevent many issues, ensuring your clock functions smoothly and accurately.
6.1 Syncing Problems
Syncing problems with your Oregon Scientific Projection Clock can occur due to poor signal reception or incorrect time zone settings. Ensure the clock is placed near a window, away from walls or electronic devices that may interfere with the atomic signal. Check the time zone setting to confirm it matches your location. If the clock fails to synchronize, try resetting it by removing the batteries for 30 seconds. Reinstall the batteries and allow the clock to search for the signal again. If issues persist, ensure the clock is updated with the latest firmware or contact customer support for assistance. Regular checks can prevent syncing errors and maintain accurate timekeeping.
6;2 Projection Clarity Issues
If your Oregon Scientific Projection Clock’s display appears blurry or distorted, ensure the projection lens is clean and free of dust. Use a soft cloth to gently wipe the lens. Adjust the projection angle by tilting the clock to optimize image clarity. Check the brightness settings, as overly dim or bright projections can reduce visibility. Ensure the clock is placed on a stable surface and the projection surface is smooth. If issues persist, verify that the clock is updated with the latest firmware. For severe clarity problems, resetting the clock to factory settings may resolve the issue. Environmental factors, like room brightness, can also affect projection quality.
6.3 Alarm Malfunctions
If your Oregon Scientific Projection Clock’s alarm is not functioning correctly, first ensure the alarm is properly set and enabled. Check that the time zone and AM/PM settings are accurate, as incorrect time settings can disrupt alarms. Verify that the alarm volume is not set too low and that the snooze feature is not engaged. If the alarm fails to trigger, ensure the clock is synchronized with an atomic signal or manually set the correct time. Low battery levels can also cause alarm malfunctions, so check or replace the batteries as needed. If issues persist, reset the clock to factory settings and reconfigure the alarm. Ensure the alarm is set correctly after the reset. Always refer to the manual for specific alarm setup instructions, as different models may vary slightly in functionality. Environmental factors, such as interference from other devices, can occasionally affect alarm performance, so relocating the clock may resolve the issue. For persistent problems, contact Oregon Scientific customer support for assistance or potential repairs. Regularly updating the clock’s firmware, if available, can also help resolve alarm-related issues and improve overall performance. Always ensure the clock is placed on a stable surface and away from direct sunlight or extreme temperatures, as this can impact its internal mechanisms and alarm accuracy. If the alarm is not sounding at all, check the speaker for dust or debris, which can muffle the sound. Cleaning the speaker gently with a soft brush or cloth may restore the alarm’s audio. Additionally, ensure that the clock’s brightness settings are not interfering with the alarm’s ability to function properly, as some models may have features that disable alarms during certain display modes. By following these steps, most alarm malfunctions can be resolved effectively, ensuring reliable wake-up performance. Always refer to the official manual for model-specific guidance, as features and troubleshooting steps may vary. If the issue persists despite these efforts, it may indicate a hardware problem that requires professional attention. Oregon Scientific’s customer support team can provide further assistance or direct you to authorized service centers for repairs. In some cases, replacement may be necessary if the clock is no longer under warranty and repairs are not feasible. Always keep the original packaging and accessories to ensure proper transportation of the clock if servicing is required. Regular maintenance, such as updating settings and cleaning the device, can help prevent future malfunctions and extend the lifespan of your Oregon Scientific Projection Clock. For additional troubleshooting resources, visit the official Oregon Scientific website or consult online forums where users share solutions and experiences. Community support can often provide quick fixes or alternative solutions that are not covered in the manual. By combining these strategies, you can enjoy uninterrupted functionality and reliable performance from your Oregon Scientific Projection Clock. Always prioritize proper setup and maintenance to maximize its features and longevity. If you’re still unsure about any aspect of the alarm functionality, reaching out to customer support is the best course of action to ensure your clock operates as intended.

Accessories and Compatible Products
Oregon Scientific Projection Clocks offer a range of accessories, including backup batteries, power adapters, and mounting brackets. Compatible products like wireless sensors and travel cases enhance functionality and portability.
7.1 Available Accessories
Oregon Scientific Projection Clocks come with a variety of accessories to enhance functionality. Backup batteries ensure continuous operation during power outages, while power adapters provide reliable charging. Additional features include mounting brackets for wall installation and wireless sensors for monitoring indoor temperature and humidity. Some models offer remote controls for easy adjustments, and protective cases are available for travel. Optional screen protectors prevent dust and smudges on the projection lens. Instructional DVDs or guides may also be included for setup and customization. These accessories ensure optimal performance and convenience, making the clock versatile for different user needs and environments.
7.2 Third-Party Compatibility

Oregon Scientific Projection Clocks can integrate with various third-party devices and systems, expanding their functionality. Many models are compatible with popular smart home systems, allowing voice control through Amazon Alexa or Google Assistant. Additionally, third-party apps can sync with the clock’s data, such as weather updates or alarm management. Some users pair their clocks with external sensors for enhanced environmental monitoring. Third-party compatibility ensures versatility, enabling seamless integration with other gadgets and platforms. This feature-rich adaptability makes Oregon Scientific Projection Clocks a versatile choice for modern households seeking enhanced connectivity and convenience.
Oregon Scientific Projection Clocks offer a versatile, user-friendly experience, combining functionality with style. Their advanced features and ease of use make them an excellent addition to any home.
8.1 Final Thoughts
Oregon Scientific Projection Clocks are an excellent choice for those seeking a blend of innovation and practicality. Their projection display, atomic time synchronization, and customizable features provide unmatched convenience. With easy setup and maintenance, these clocks are ideal for everyday use. The combination of style and functionality makes them a great addition to any room. Whether for home or office, Oregon Scientific Projection Clocks deliver reliability and modern design, ensuring accurate timekeeping and enhanced productivity. Their user-friendly interface and advanced capabilities make them a standout option in the market, catering to diverse needs and preferences with ease and efficiency.

Additional Resources
Explore official manuals, online forums, and customer support for troubleshooting, updates, and accessories. These resources ensure optimal use and maintenance of your Oregon Scientific Projection Clock.
- Official manuals
- Online forums
- Customer support
9.1 Official Manuals and Guides
Oregon Scientific provides comprehensive manuals for their projection clocks, detailing setup, features, and troubleshooting. These guides are available on the official website or included with purchase. They cover topics like time synchronization, alarm settings, and projection adjustments. Manuals are often downloadable in PDF format for easy access. Additionally, some retailers like Amazon or eBay may offer digital versions. For specific models, ensure to download the correct manual for accurate instructions. These resources are invaluable for understanding your clock’s full potential and resolving any operational issues efficiently. Always refer to the official manual for warranty and maintenance guidelines to ensure longevity and optimal performance.
9.2 Online Forums and Communities
Online forums and communities are excellent resources for Oregon Scientific projection clock users seeking advice, troubleshooting tips, or shared experiences. Platforms like Reddit, specialized electronics forums, and dedicated groups on social media often host discussions about these clocks. Users can find solutions to common issues, learn about optimal settings, or even discover creative modifications. These communities foster collaboration, allowing owners to exchange ideas and gain insights from others. They are particularly useful for addressing niche concerns or exploring advanced features. Joining these forums can enhance your understanding of the projection clock and provide a supportive environment for resolving queries or improving functionality.
9.3 Customer Support Contact Information
For assistance with your Oregon Scientific projection clock, contact the manufacturer’s customer support team. Visit the official Oregon Scientific website to find detailed contact information, including phone numbers, email addresses, and support forms. Many models also include contact details in the provided manual. Reach out to their support team for inquiries, repairs, or replacements. Additionally, authorized retailers or distributors may offer dedicated support services. Ensure to have your product serial number ready for efficient assistance. Their support team is available to address technical issues, warranty claims, or general questions about your projection clock;